Frequently Asked Questions are listed below.
(Open all solutions) (Close all solutions)iPhone/iPad FAQ
Connections FAQ
- Port Forwarding, what is UPnP?
-
- Port Forwarding
- UPnP
Port Forwarding is a setting that sends signals from specific port to specific IP when using routers. Signals from outside cannot be sent to all PCs connected to routers so it’s a setting to send signals from port 2501 to A’s PC and send signals from port 2503 to B’s PC Please refer to the link for details.
This is a standard technology for Searching and connecting MS supportive devices and with this technology users can manually set port forwarding on router without particular settings. Even if it's not sharing the same internal network environment via router etc. you can connect to home PC or office PC with 3G and Egg outside when Port Forwarding is set properly. This feature is using router’s technology called uPnP-IGD. Recent routers released within 1~2 years mostly have this technology and users can access to home PC without additional setting. But if you are using older models that does not support uPnP-IGD or if you had disabled the feature for security purpose, or in doubele-NAT environment which 2 or more routers are used to re-share, you must set port forwarding directly to router in order to use from outside properly. Please refer to the link for details.
- I cannot connect to local network (Wi-Fi)
-
First, check if iPad and iPhone is connected to same network with the computer.
- You won't be able to see computer on the "Public" part in server list of iPad and iPhone.
-
Go to "AVStreamer Server > Setting > General" and check if "Allow this computer to be automatically discovered" is checked.
- I cannot connect to External Network (3G,4G)
-
Able to connect local network(Wi-Fi)?
- Yes I can
-
Able to connect through HUB server?
- No, What is HUB sever?
-
You can search and connect to your PCs easy and safe when you log in with HUB server account. Please refer to the link for connecting information from client (iPad, iPhone) and server (Windows, Mac OSX) to Hub server and try again. iPad setting for Hub server connection iPhone setting for Hub server connection Android setting for Hub server connection Windows server setting for Hub server connection Mac OSX server setting for Hub server connection
- Yes, connected.
-
Does your router supports UPnP or NAT-PMP?
- No, the router does not support UPnP or cannot get further support from the router company.
-
If your router does not support UPnP or NAT-PMP or router company does not support any more, you need to set Port Forwarding manually.
- Uncheck the port forwarding box if it is checked "Automatically configure port forwarding" in "AVStreamer Server > Setting > Advanced".
-
Add new port mapping manually as below in router’s setting.
When UPNP is not supported in "automatically configure Port Forwarding" in "AVStreamer Server > Setting > Advanced", Manual setting in router’s setting page.
* External Port : Input "AVStreamer Server > Setting > Advanced > Port Number" * Internal Port : Same as External port * Protocol : TCP * IP Address : IP Address of the device which AVStreamer server is installed. - Windows Server : Use left IP Address among IP Addresses showing at the top of Setting screen. - Mac Server : "AVStreamerMac Server > Setting > General > Basic Information > Private IP address" use
- Yes, but when I check "AVStreamer Server > Setting > Advanced > Automatically configure port forwarding", I see "No UPnP or NAT-PMP compatible device was found" message.
-
When you see a message as below in "AVStreamer Server > Setting > Advanced > Automatically configure port forwarding".
"No UPnP or NAT-PMP compatible devices was found."
- Check if UPnP feature is activated in Router’s Setting page.
- Some Routers will have UPnP feature deactivated. Please refer to the user’s guide for Routers and activate UPnP feature manually.
- Some Gio™ routers have UPnP feature is disabled from the beginning. Please refer to the user’s guid and enable UPnP feature.
- Some AnyGate™ router models may have problem using UPnP feature. If you see any error messages in "AVStreamer Server > Setting > Advanced > Automatically configure port forwarding" or "No UPnP or NAT-PMP compatible device was found" message, refer to the router’s user guide to set Port Forwarding manually.
- Yes, I see error message in "AVStreamer Sever > Setting > Advanced > Automatically configure port forwarding".
-
When message below shows in "AVStreamer Server > Setting > Advanced > Automatically configure port forwarding".
Setting up port forwarding failed.
- Some routers have UPnP feature problems. Please refer to router’s user guide to set Port Forwarding manually.
- Some Gio™ routers have UPnP feature is disabled from the beginning. Please refer to the user’s guid and enable UPnP feature
- Some AnyGate™ router models may have problem using UPnP feature. If you see any error messages in "AVStreamer Server > Setting > Advanced > Automatically configure port forwarding" or "No automatic Port Forwarding router is available" message, refer to the router’s user guide to deactivate UPnP feature and set Port Forwarding manually.
- Yes, Port Forwarding is properly set but still cannot connect.
-
- Connection may fail if there is a firewall in router. In this case open the port AVStreamer is using in router firewall setting ("AVStreamer Server > Setting > Advanced > Port number") Router firewall setting may differ from product to product. Please refer to the user’s guide or router product site to add manually.
- Windows firewall will automatically registered when AVStreamer is installed. If you are using other products than Windows firewall, it may not be connected.
- Yes, I see “Possible double NAT detected. Must be set manually.” message.
-
When you click "AVStreamer Server > Setting > Advanced > Automatically configure port forwarding" and see below message, it means your computer is consisted with 2 or more routers. Network performance will fall and will not be able to connect directly to your computer from other computers.
Possible double NAT detected. Must be set manually. There are several reasons for this troubleshooting but mostly relevant to the followings.- 2 or more routers are to set NAT in computer network.
- By setting Port Forwarding manually on router Please refer to How to Port Forward when there are more than 2 routers for detail.
- By setting DMZ Please refer to solution by setting DMZ when there are more than 2 routers for detail.
- By setting the second router to bridge mode Activate NAT and DHCP on first router’s setting page that is connected to internet and set to bridge mode for the second router. Second router needs to support bridge mode. Please refer to solution by setting bridge mode when there are more than 2 routers for detail.
- When official IP address is not assigned by internet provider
This is a general case when internet provider assigned official IP address and network composition has problem. You can simply solve this problem by changing the router setting in 3 ways.
This can be solved only when internet provider assigns official IP address. Simply call internet providing company to solve this problem.
Still troubleshooting? Please send e-mail to AVStreamer customer center.
- No, cannot connect
-
First check if is connected to local network(Wi-Fi).
- How to Port Forward in manual (other routers)
-
Router’s Port Forwarding setting may differ depending on the manufacturers.
Other than ipTIME router, you can find how to Port Forward in below links. http://portforward.com/english/routers/port_forwarding/routerindex.htm
Or you can refer to the manuals provided in manufacturers websites listed below to add manually.
No Company Homepage Customer Center Tel 1 ALTech www.airlinktek.com Support 02) 566-3879 2 Z i O www.zio.ne.kr FAQ 1588-1696 3 NetGeaer www.netgear.co.kr FAQ | Q&A 080-638-4327 4 Netami www.netami.co.kr FAQ 02) 831-6001 5 CybRon web.waycos.co.kr FAQ 1588-3835 6 EFM Networks www.iptime.co.kr Q&A 1544-8695 7 (ipTime) www.iptime.co.kr Q&A 1544-8695 8 NetTop www.nettop.co.kr Q&A | FAQ 02) 703-2944 9 UniCorn www.eunicorn.co.kr FAQ 1588-2713 10 SMC Networks www.smc.com - 02) 711-5302 11 BufFalo www.buffalotech.co.kr Q&A 02) 2057-2094, 2095 12 3COM www.3com.com - 080-698-0880 13 LanStar www.lanstar.co.kr - 02) 717-3386(48) 14 LanMart www.lanmart.co.kr Forum 080-717-3386 15 AirBand www.airband.co.kr Q&A 1588-7655 16 KIT Network www.kitnetwork.co.kr Q&A | Manual 02) 702-3200 17 GigaByte gigabyte.jchyun.com Customer Center 02) 707-5000, 1577-3367 18 Ubase www.Ubase.co.kr A/S 032) 622-0114 19 JMPsystem www.jmpsystem.com Q&A | PDS 02) 415-0020 20 TeamWork www.myteamwork.co.kr Q&A | FAQ 031) 725-9579, 1588-7080 21 D-Link www.d-link.co.kr Customer Center 02) 749-3965 22 LanJangbi www.lanjangbi.co.kr - 02) 798-9114 23 SPIRE www.espire.co.kr Q&A | FAQ 02) 2120-3039 24 SpaceTek www.spacetek.co.kr FAQ | Q&A 080-229-0235 25 FineLan www.finelan.co.kr FAQ | Q&A 031) 788-8844 26 GustLink www.gustlink.co.kr Q&A 0505-226-2266 - Solution by setting bridge mode when there are more than 2 routers
- Second router needs to support bridge mode or wireless multi bridge mode. To set, activate NAT and DHCP on internet connected first router’s setting page and set the rest router to bridge mode
- How to change monitor new
-
AVStreamer is support max 8 monitors.
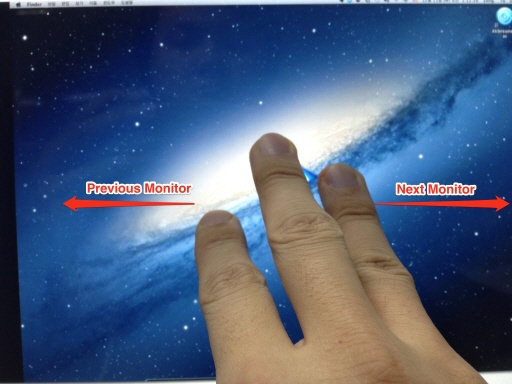
You can change the monitor with gestures or configuration menu.- With configuration menu
-
- Click [Config] button.
- Click [Monitor].
- Click monotir number to change
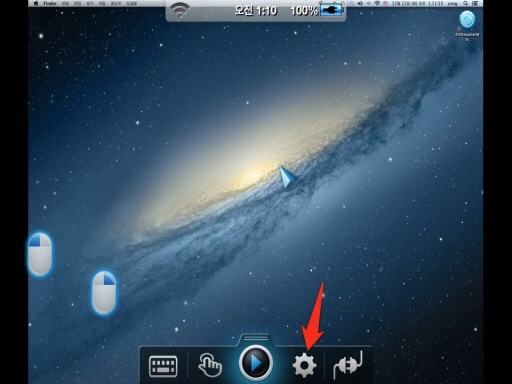
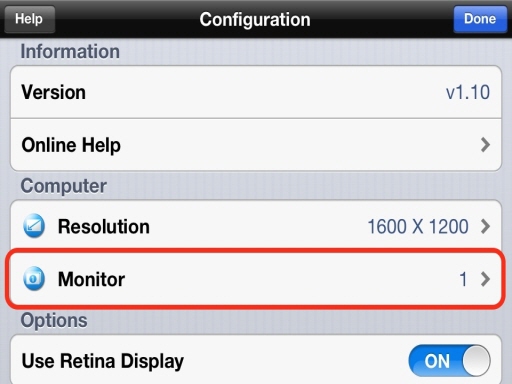
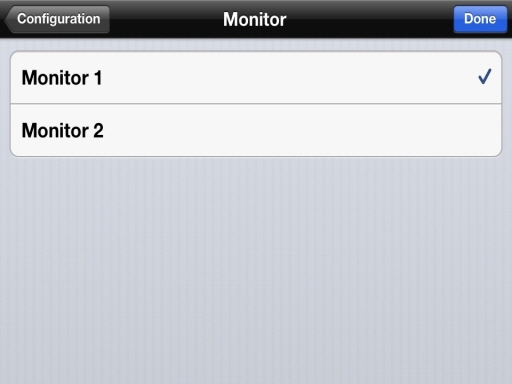
- With gesture
-
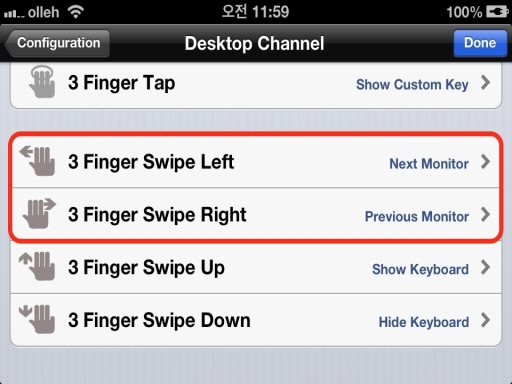
- You can move to the next monitor or previous monitor with 3 finger swipe gesture on the screen.
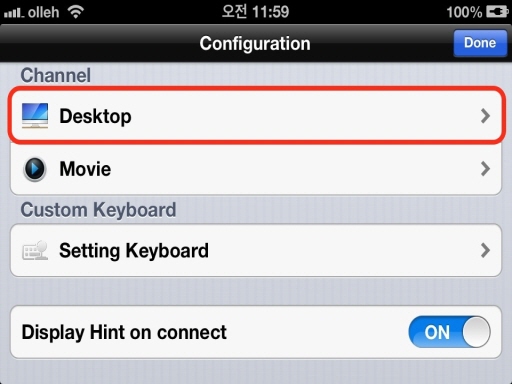
- You can change gesture configuration
Click [Desktop]. - Change gesture configuration in 3 Finger Swipe Left menu or 3 Finger Swipe Right menu.
- How to add Esc,Ctrl,Alt,Shift key from custom keyboard
-
Adding ESC, Ctrl,Alt,Shift key for Diablo3
- How to add on iPad
-
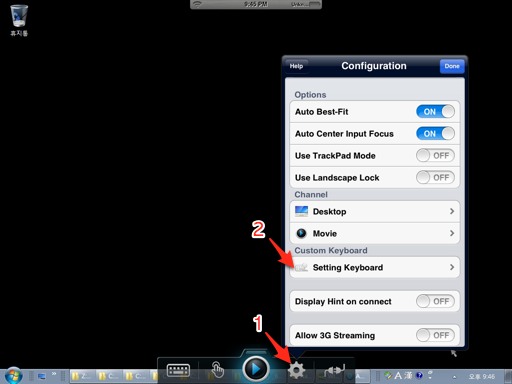
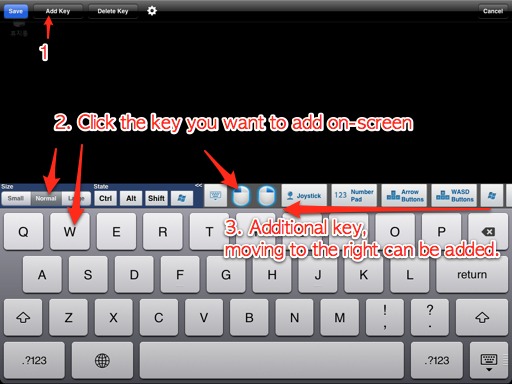
- Go to Settings and click "Setting Keyboard"
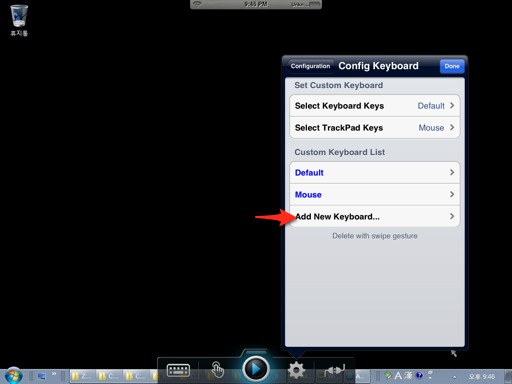
- Click "Add New Keyboard"
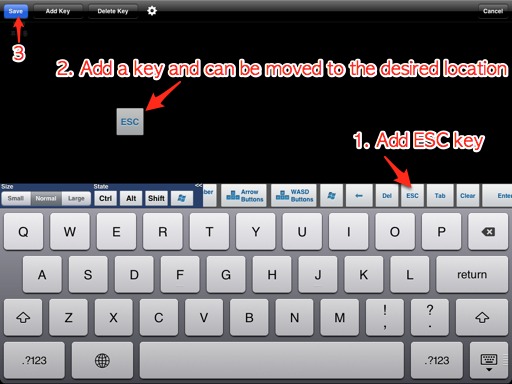
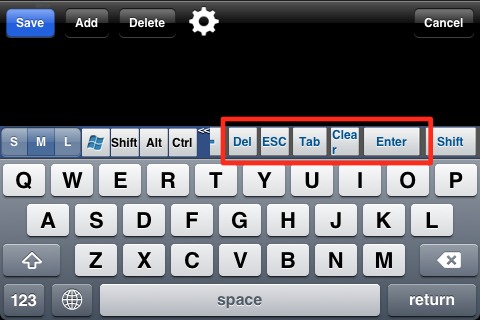
- Click "Add Key" and click the key you want to add on-screen. As you can see on number 3, you can swipe to find more keys and add
- Move the added key to desired location and click save button
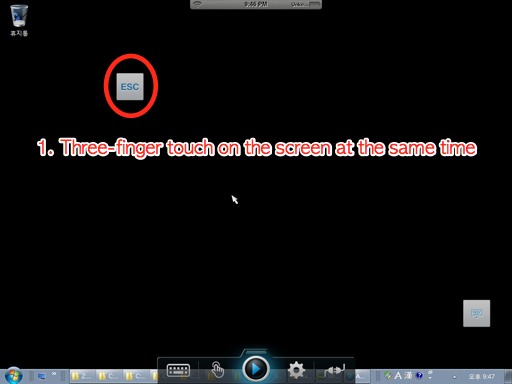
- Three-finger touch will show the custom keyboard you just added
- How to add on iPhone
-
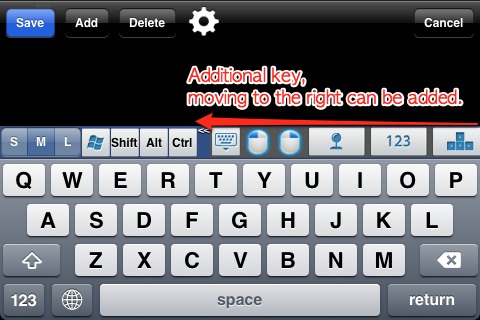
- Same as iPad, go "Setting > Setting Keyboard", and click "Add New Keyboard".
- Click "Add Key" and click the key you want to add on-screen. As you can see on left image, you can swipe to find more keys like Esc,Ctrl,Alt,Shift keys and add
- Three-finger touch will show the custom keyboard you just added.
- How to hide the mouse button on the trackpad new
-
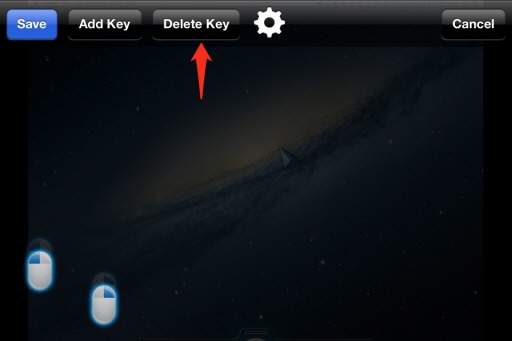
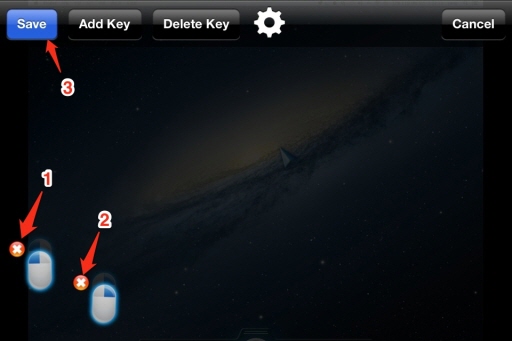
How to hide the mouse button on the trackpad
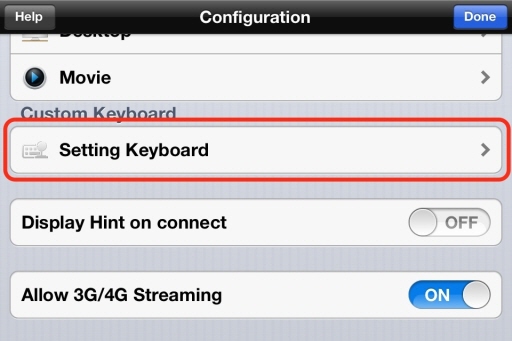
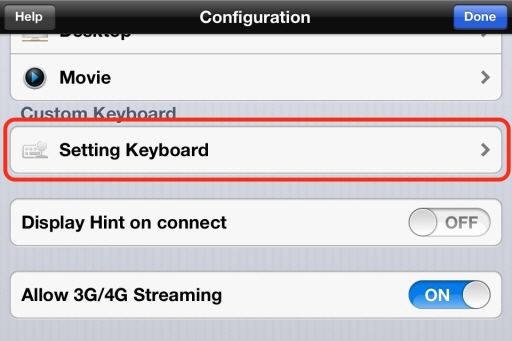
- Click [Config] button
- Click [Setting Keyboard] button
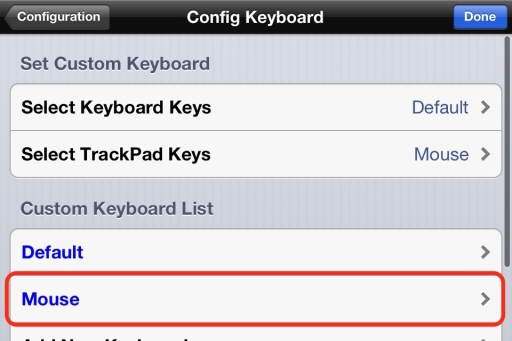
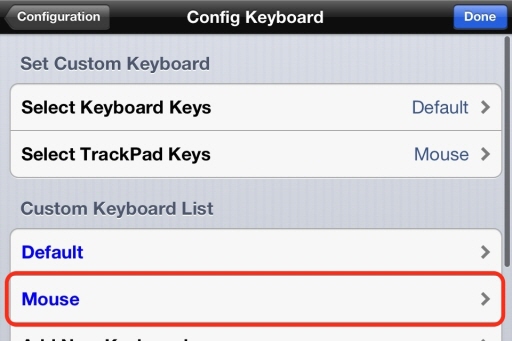
- Click [Mouse] button
- Click [Delete Key] button
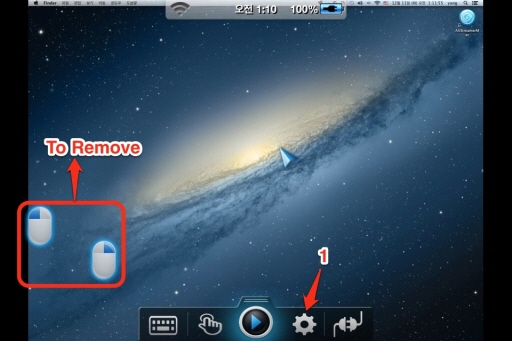
- After clearing the display by pressing the X button above the mouse button, click the [Save] button.
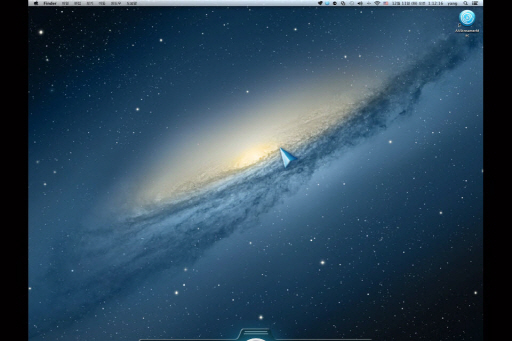
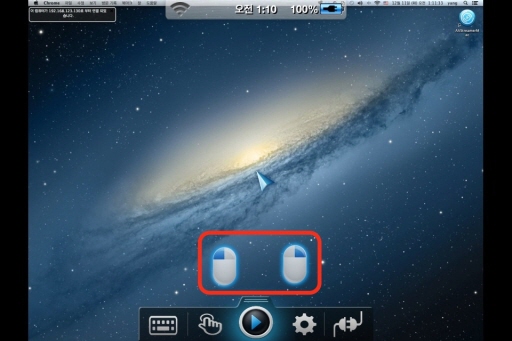
- Now, as shown in the figure below, the mouse button has disappeared in the trackpad mode.
- How to move the mouse button on the trackpad new
-
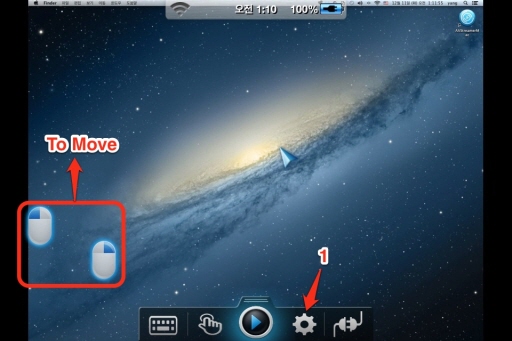
How to move the mouse button on the trackpad
- Click [Config] button
- Click [Setting Keyboard] button
- Click [Mouse] button
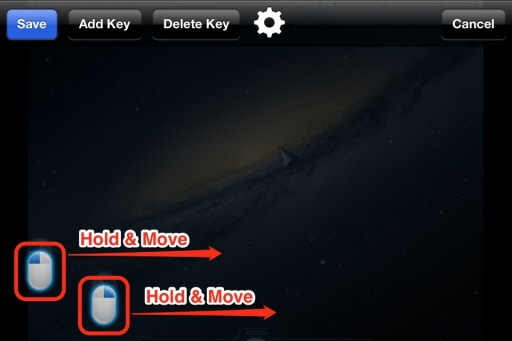
- Hold down the mouse button, Moves the mouse button to the desired location.
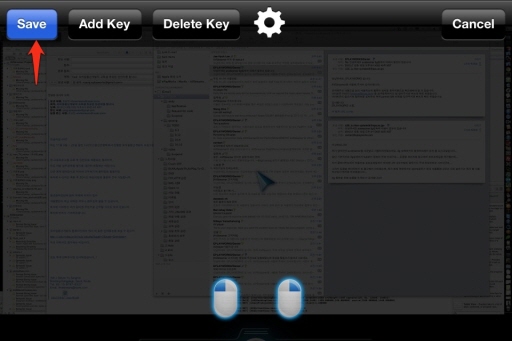
- Click [Save] button
- Now, as shown in the figure below, the mouse button has moved in the trackpad mode.
- When screen blinks while running the game
-
Some game screens blinks when you play in full screen mode. This will not happen if you change to window mode from full screen mode. Most of the games will support Window mode.
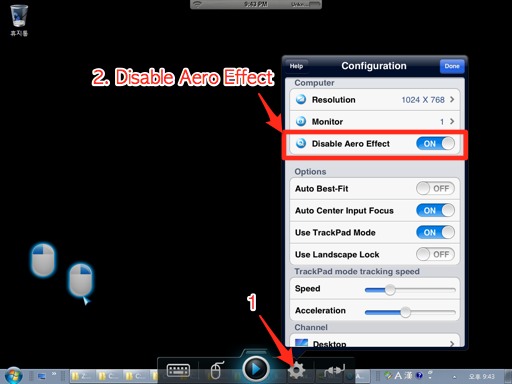
If you disable the Aero Mode (only Windows) you can enjoy your game in a better speed.
- When there is no sound from iPad/iPhone or sound from Mac server speaker
-
This happens when Soundflower is not installed on Mac server or if there were erro while installing.
- Download Soundflower and install You can download Soundflower here. Open *.dmg and double click Soundflower.pkg. Carry on with installaltion.
- Check if Soundflower is installed properly.
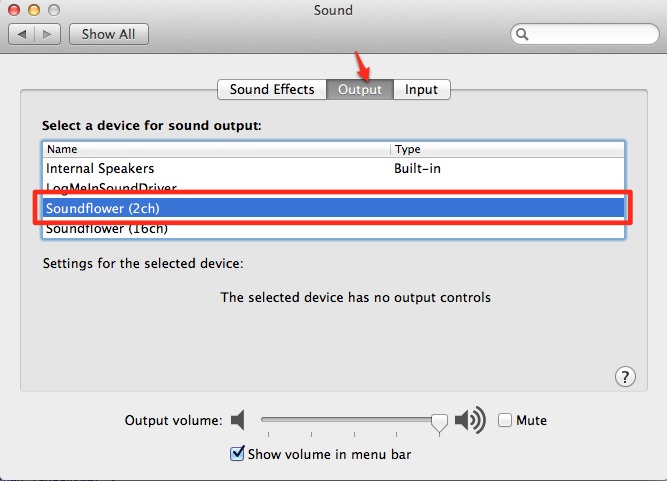
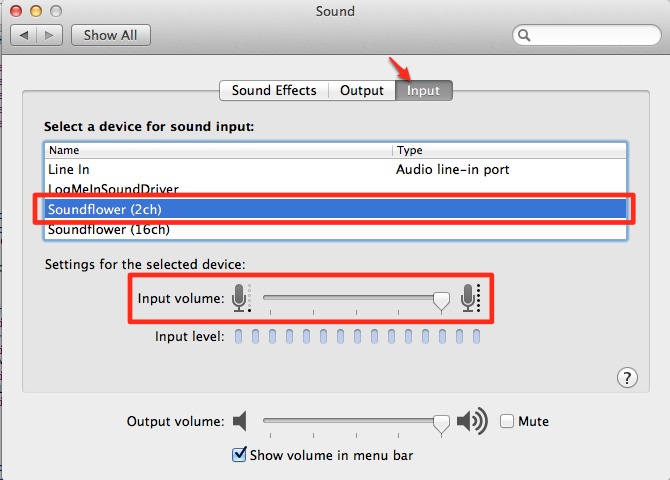
- Output and Input should show Soundflower(2ch) in the drop down menu.
- Maximize the Input volume as showing below.
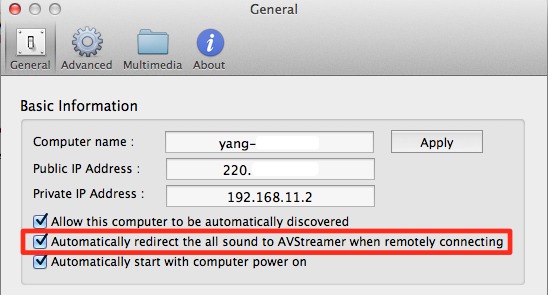
- In AVStreamerMac setting, check if “Automatically redirect the all sound to AVStreamer when remotely connecting” box is checked.
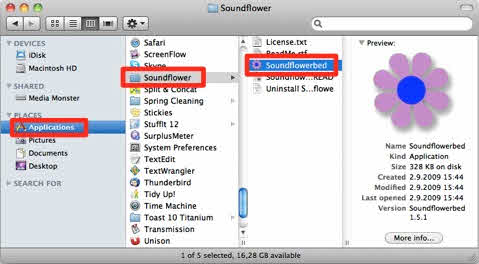
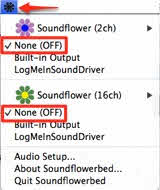
- Still sound doesn’t work? Please refer to below. Go to Soundflower setting option. See if Soundflower(2ch) properties are set as None(Off)
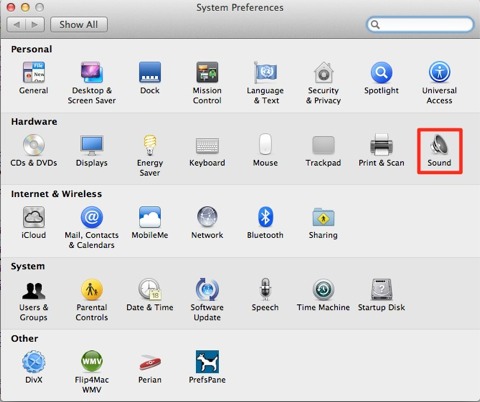
Go “System Preferences > Sound”.

Now check if connecting iPad/iPhone to Mac server sound is working.
- Video lags on Mac mini
-
When Mac mini is not connected to monitor video, camera play can lag. Connect motitor to Mac mini to play clips, camera.
- Setting Automatic log-in
-
AVStreamerMac doesn’t support connecting right after booting. This feature will be supported soon. If you want to connect right after the Mac booted, you have to setup an automatic login. Please refer to the following.
- Go to “System Preferences > Users and Groups”.
- Set “Automatic Login” to on.
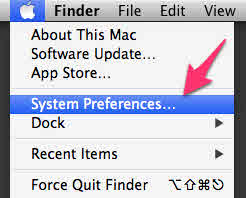

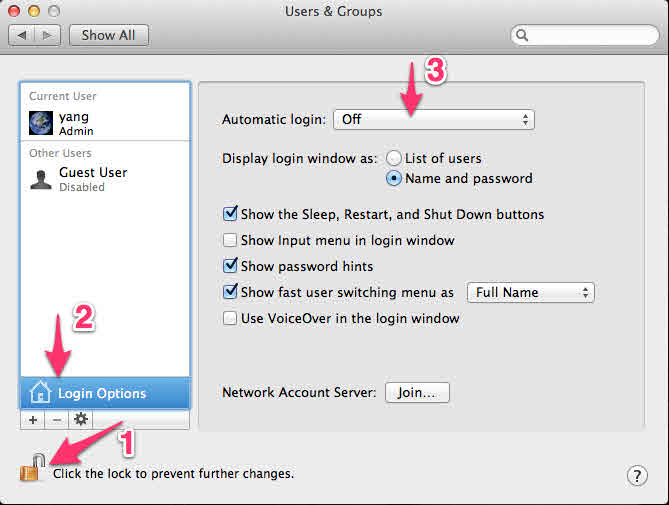 Click “Click the lock to prevent further changes” and input password.
Click “Login Options”.
Click “Automatic login” and choose the account you want.
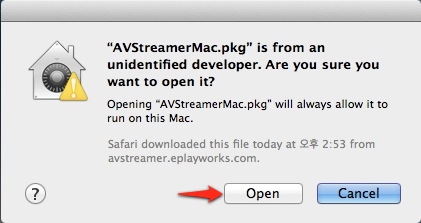
- When AVStreamerMac server installation in Mac OS X version 10.8 occurs error. new
-
AVStreamerMac server installation in Mac OS X version 10.8 sometimes occurs error.
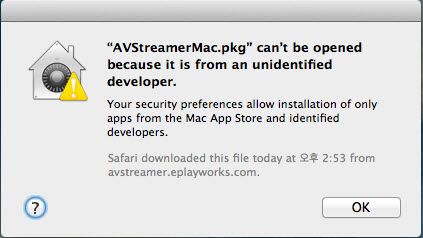
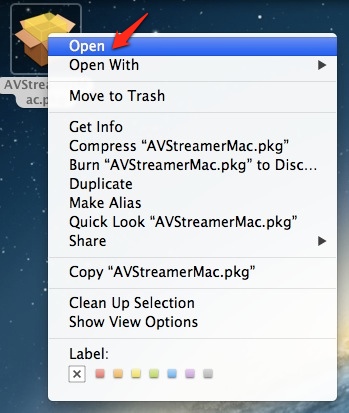
Please install in the same manner as in the figure below.
- 1. AVStremerMac server package, right-click, and then click [Open].
- Click [Open]
- How to stream on Apple TV using AirPlay
-
AVStreamer supports Mirroring Mode out of 3 modes (Streaming, Mirroring, Dual Screen)
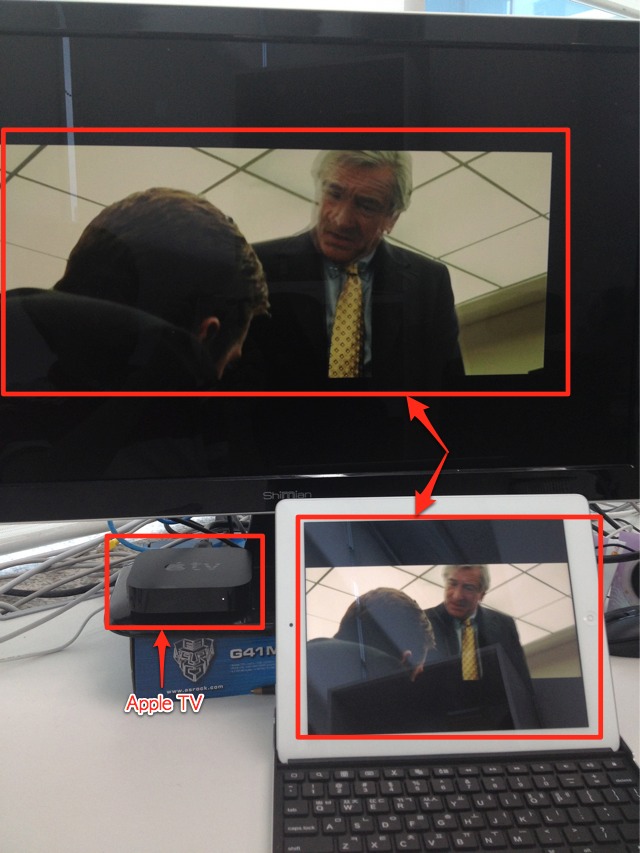
AirPlay mirroring is a feature for showing iPhone 4S, iPad 2nd Generation, The New iPad screen on HDTV via Apple TV (2nd, 3rd generations only). You can see the same screen in Apple TV showing in AVStreamer by using AirPlay mirroring.
For Apple TV streaming via AirPlay Mirroring on AVStreamer, you need the followings.
- iPhone 4S, iPad2, The New iPad with iOS 5 and above Below iOS 5 only supports AirPlay mirroring via cable connect. Wireless Airplay mirroring requires iOS 5.
- Apple TV (2nd or 3rd Generation) with software version 5.0 and above.
- iPhone or iPad and Apple TV needs to be connected in same Wi-Fi network.
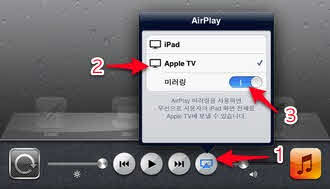
- Double click the home button and reveal the latest used applications.
 Swipe left till you see the icon.
- Activate AirPlay mirroring
- See if AVStreamer screen is showing on Apple TV
- I can’t see internet lecture, clips, players(Gom, KMP, Podplayer etc.) on Windows server
-
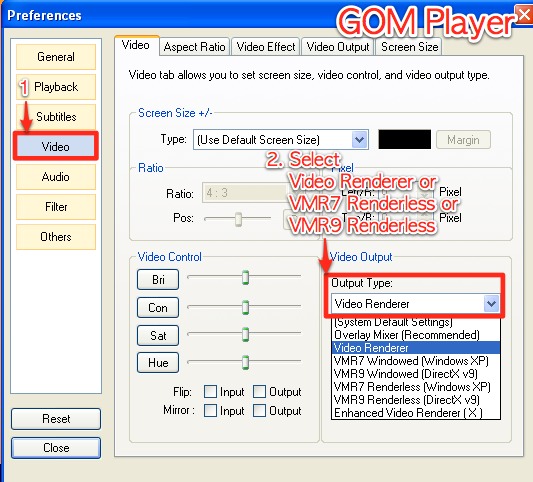
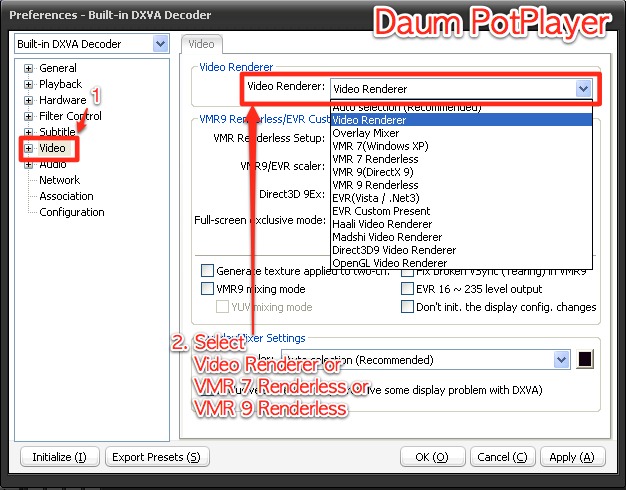
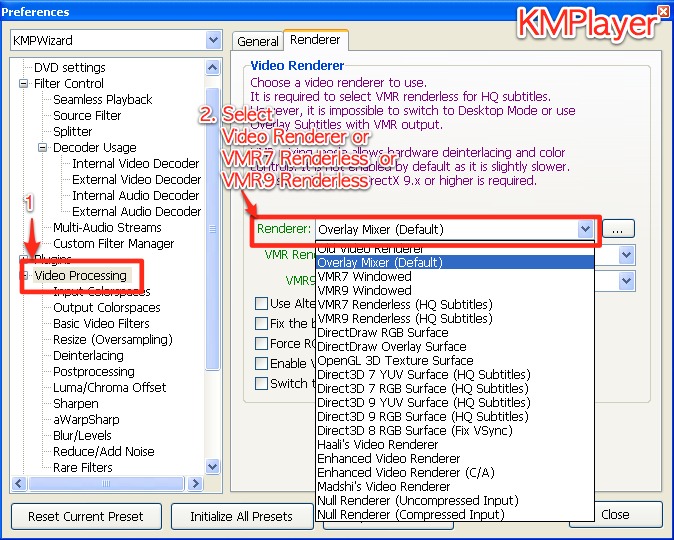
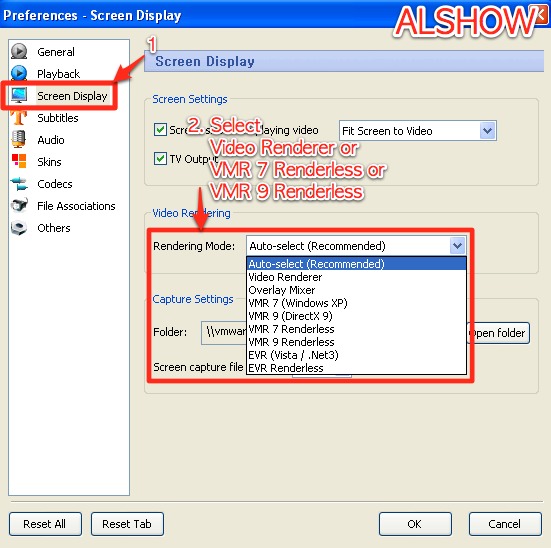
Gom Player, KMPlayer, Daum Podplayer does not capture when using overlay mixer. Turn off Overlay feature on each player. Refer to the following image for turning off Overlay on the Player.
- Gom Player
- Daum Pot Player
- KMPlayer
- ALSHOW
- How to add movie folder
-
- How to add movie folder in Window
-
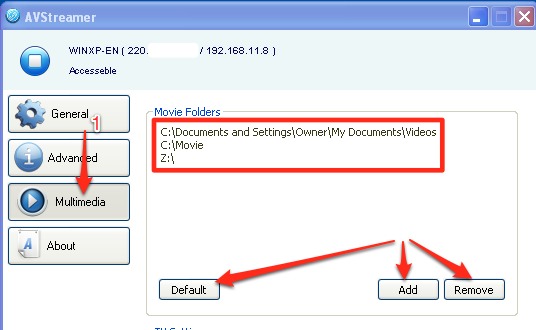
- Click AVStreamer icon on tray.
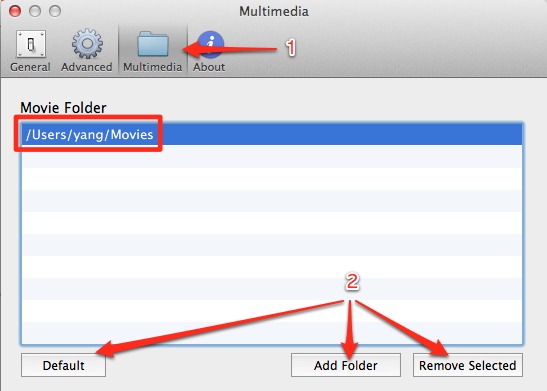
- You can add or erase movie folder when you move to Multimedia menu

- How to add movie folder in Mac
-
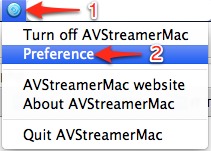
- Click AVStreamerMac icon on Menubar and Preference.
- You can add/erase movie folder when you go to Multimedia menu
- How to play FLAC on Mac
-
You need additional codec to play lossless zipped audio codec FLAC. Follow the order for installing the codec and reboot Mac to play FLAC.
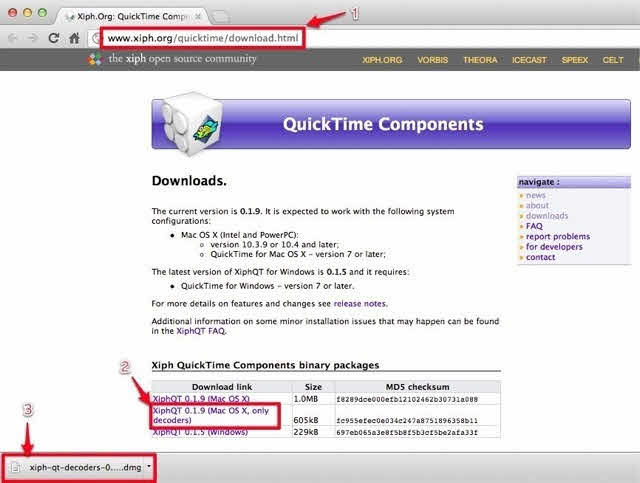
- Download XiphQT (Mac OS X, only decoders) codec here and click dmg file.
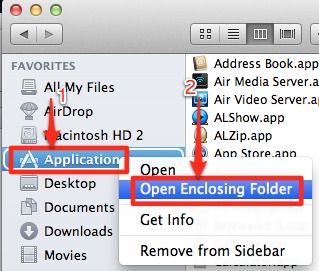
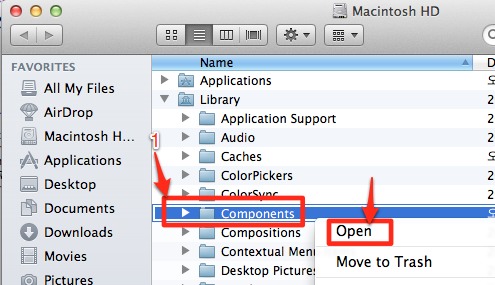
- On finder, click Application > right mouse click > Open Enclosing Folder.
- Go to "Library > Components > Right mouse click > click Open". If there is no Components folder, you should create one.
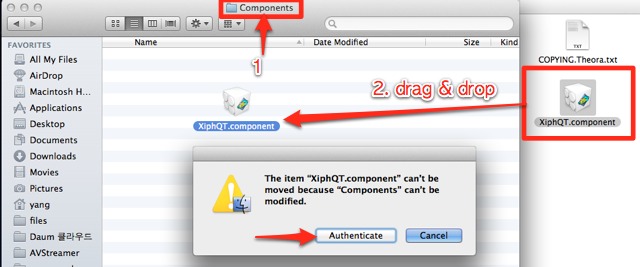
- In dmg file inside Component folder, click "XiphQT(decoders).component" file and copy to "Components" folder. Click "Certification" and enter password
- It will appear as below when copying is done.
- Rebooting

Now you can play the flac encoded video on Mac and AVStreamer.
- Subtitle on/off
-
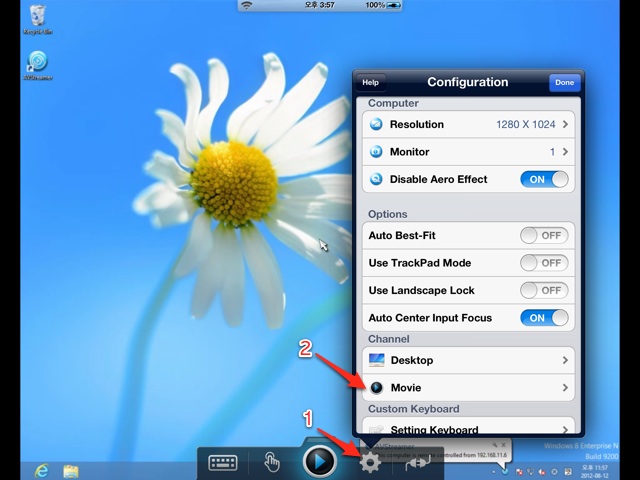
- Configuration > Channel > Movie click
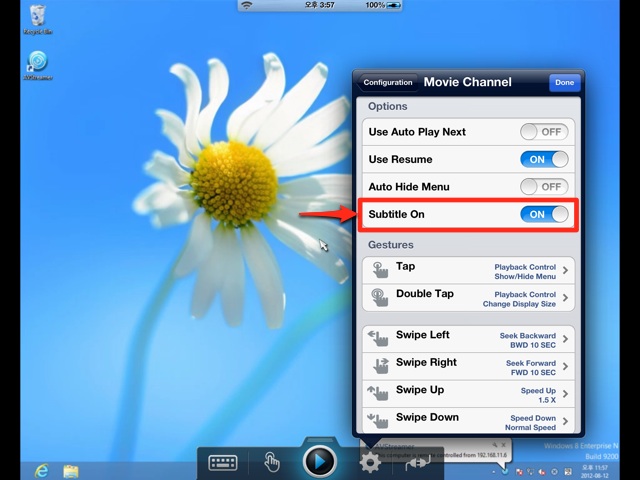
- You can turn subtitle on/off in Option > Subtitles.
- If there are no sound in iPad/iPhone after connecting to Windows XP server
-
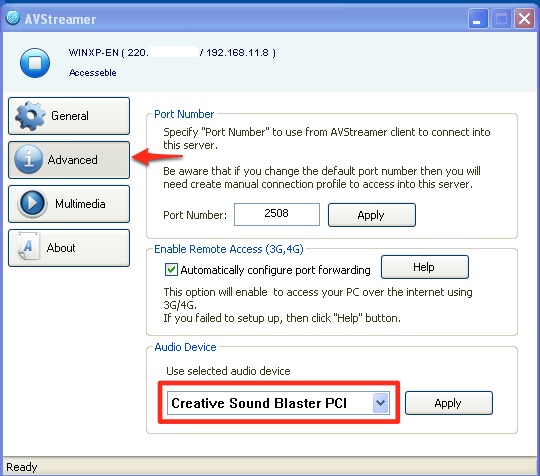
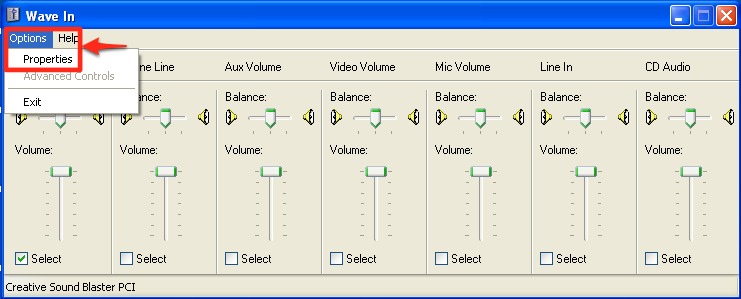
In order to hear the sound from XP on iPad/iPhone, you need to use stereo mix feature on Windows XP. AVStreamer server automatically detects and tries setup. But in case auto setup fail, you may do it manually as below. (Some systems may not support sound features)
- Select a sound device in "AVStreamer Server > Setting > Advanced > Use selected audio device".
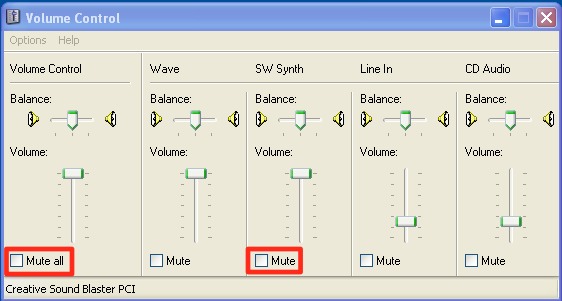
- Open Volume Control
- Click Option > Properties
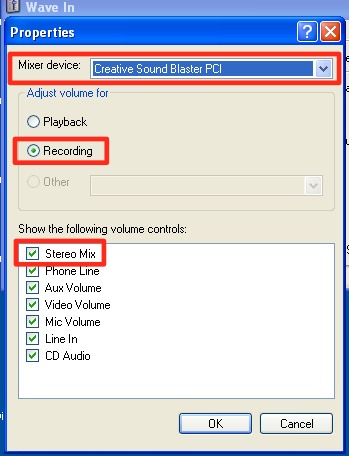
- Choose “Stereo Mix” in recording device
- Select "Recording" for "Adjust volume for" in properties
- Select the chosen device name in "AVStreamer server > Setting > Advanced > Use selected audio device"
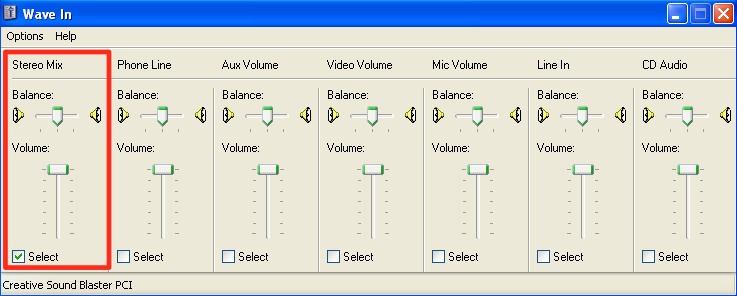
- Choose "Stereo Mix" and Click OK button
- If "Stereo Mix" does not show on system, you might want to update your sound card driver.
- If you see "Stereo Mix" part, check "Select" box
- If it’s "Mute" box that’s checked, uncheck it
- Audio device on System Tray must be activated for proper sound output in streaming
- Proper Status

- Improper Status


- If Stereo Mix device does not appear on Windows XP sound device
-
"Stereo Mix" Device is a feature support from sound chipset that allows to record the sound from computer. Depending on computers, "Stereo Mix" may described as following.
- Stereo Mixer
- Mixed Output
- Stereo Mix
- Mixed Out
- Stereo Output
- What U hear
- Stereo Out
- Loop back
- Digital Mixe
- Post-Mix
- Digital Mix
- Sum
- wave out mix
- Wave / MP3
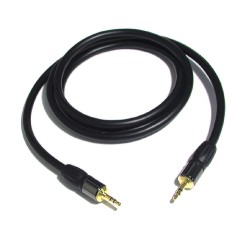
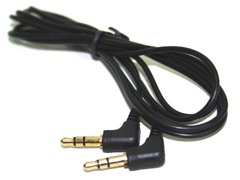
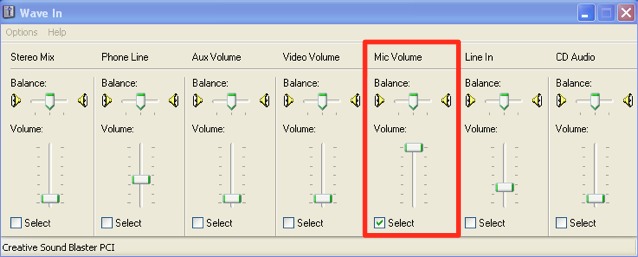
- connect speaker(headset) output to Mic input.
- In the Properties window of the recording, select the microphone.
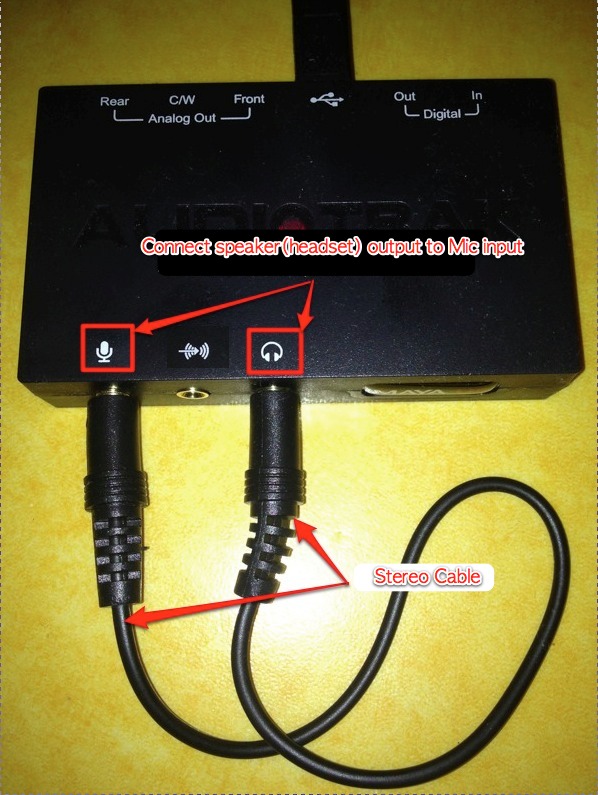 This image is a USB device with stereo feature. Generally you can find speaker (headset), mic input sockets at the back of the PC.
- I am using Windows XP and I could not see login screen on AVStreamer after rebooting.
-
When using Windows XP, there are cases where normal capture of login and lock screens are not working properly in AVStreamer. This often happens especially when you connect through remote desktop withing Windows.
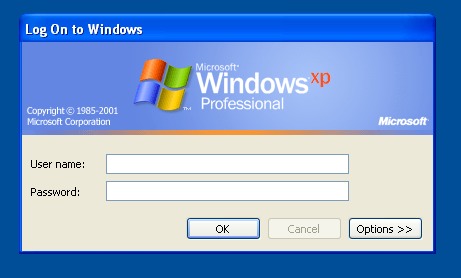
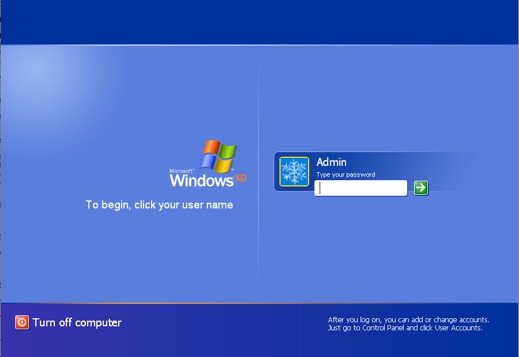
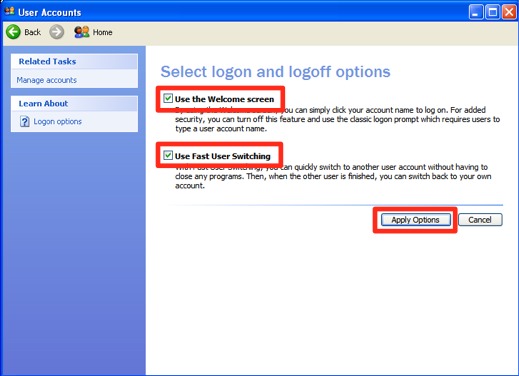
In this case, the problem is because "Use the Welcome screen" is not checked in Windows login screen options.
Hence, If the login screen is as "Figure 1" on the computer monitor, change the settings to "Figure 2".
- Figure 1
- Figure 2
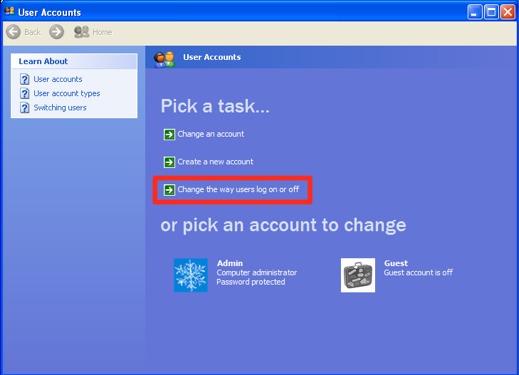
- Click "Control panel > User Accounts > Change the way users log on of off"
- Change login and logoff options
- Check "Use the Welcome screen"
- Check "Use Fast User Switching"
- Click "Apply Options"
- After reboot, you could check Windows XP login screen in AVStreamer connection.
- Figure 1


